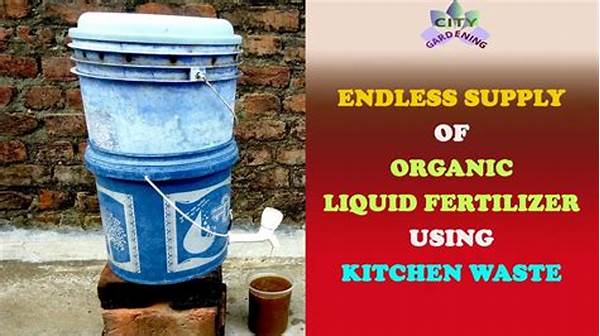
In the hustle and bustle of our daily lives, we often overlook the potential goldmine lurking in our trash. Yes, that’s right! Your kitchen scraps and organic leftovers can be magically transformed into a nutrient-rich potion for your plants. Imagine turning waste into something wonderful, something that not only amps up your garden game but also helps save the planet! Making liquid fertilizer from organic waste isn’t just a DIY project—it’s an eco-friendly journey that blends creativity, sustainability, and a bit of culinary mystery! Let’s dive into this green venture and save some green while we’re at it.
Read More : Premium Glass Food Containers Replacing Plastic In 2025
While this might sound like something straight out of a mad scientist’s laboratory, it’s actually quite simple—and a whole lot of fun! With just a little time and effort, you can concoct your very own liquid fertilizer, turning banana peels, coffee grounds, and veggie scraps into a plant-boosting elixir. The best part? You get to boast about being both an environmental hero and a gardening genius. So grab your kitchen apron, a sprinkle of curiosity, and let’s explore the alchemy of turning humble household waste into liquid gold for your garden.
Understanding Liquid Fertilizer from Organic Waste
Why Make It?
The rationale behind creating liquid fertilizer from organic waste becomes crystal clear when you consider the environmental and economic benefits. Not only does this process help reduce the amount of waste sent to landfills, but it also minimizes the need for synthetic fertilizers, which can be harmful to the environment and costly for your wallet. Reusing organic waste taps into a cycle of sustainability, where we give back to the earth what we take from it. Plus, there’s something undeniably satisfying about nurturing your plants with a homemade concoction.
The Ingredients
When embarking on this green journey, it starts with the right ingredients. Kitchen waste is an abundant and readily available resource. Banana peels, eggshells, coffee grounds, and vegetable scraps are awesome candidates. Each of these components contains essential nutrients that plants crave. For instance, banana peels are potassium-rich, coffee grounds provide nitrogen, and eggshells offer calcium—all important elements for plant health and growth.
The Brewing Process
Once you’ve gathered your ingredients, it’s time to brew your plant-friendly potion. Chop your organic waste into smaller pieces to speed up the decomposition process. Place this waste into a large container or bucket and fill it with water, ensuring the waste is fully submerged. Cover the container loosely to allow gases to escape but prevent flies from getting in. Stir the mixture every few days to help with the breakdown process. In about two to three weeks, you should have a nutrient-rich solution ready to feed your plants.
Application Techniques
Applying your homemade liquid fertilizer is straightforward. Strain the liquid to remove solid particles, and dilute it with water (approximately a 1:10 ratio) to avoid over-fertilizing. Water your plants with this mixture once every two weeks, preferably in the early morning or late afternoon when temperatures are cooler. Your plants will thank you, exhibiting lush growth and vibrant blooms.
How to Start Your Liquid Fertilizer Project
Gathering Supplies
To embark on this sustainable gardening journey, start by gathering your organic waste materials. It’s as simple as setting aside a small compost pail in your kitchen to collect scraps. Keep your toolkit simple: just a bucket with a lid, a stirring stick, water, and your organic waste. Depending on the size of your garden, adjust the quantity of waste accordingly.
Step-by-Step Process
1. Collect Organic Waste: As you prepare meals, save banana peels, coffee grounds, eggshells, vegetable scraps, and other biodegradable kitchen waste.
2. Chop and Mix: For efficient decomposition, chop larger pieces into smaller bits. Combine all waste into your bucket.
3. Add Water: Fill the bucket with water, covering the waste materials completely.
Read More : Food Containers That Stack Neatly Inside Small Apartments
4. Stir Occasionally: Every couple of days, give your mixture a stir to help along with the breakdown.
5. Let It Sit: Allow the mixture to sit for 2-3 weeks. As time passes, the nutrients will leach into the water.
6. Strain and Dilute: Once ready, strain the liquid to remove solids, then dilute with water before use.
The Benefits
This homemade liquid fertilizer is not only cost-effective, but it also means you’re doing your bit for the environment by recycling waste into a useful product. Not to mention, your garden reaps the rewards with healthier, more resilient plants.
Tips for Perfecting Your Green Potion
Optimal Ingredients
Experiment with various combinations of organic waste to determine what your plants respond to best. Some gardeners swear by banana peels while others have seen miraculous results with coffee grounds. The key is experimenting and adjusting as needed to suit the specific needs of your garden.
Safety Measures
Always remember safety when crafting your liquid fertilizer. Ensure your fermenting bucket is placed in a stable location where it won’t be knocked over. Also, place it in a shaded area to avoid overheating, which can harm the beneficial properties of your fertilizer.
Common Mistakes
Avoid over-fertilizing your plants; too much of a good thing can be detrimental. Similarly, be wary of using compromised or moldy kitchen waste, as this can lead to the growth of harmful pathogens. If you ever notice an unpleasant odor, ensure your waste is submerged in water and the bucket is properly covered.
Why Liquid Fertilizer is Your Garden’s Best Friend
Comprehensive Nutrients
The beauty of liquid fertilizer lies in its ability to provide a balanced supply of nutrients directly to your plants’ root systems. This fluid approach ensures a quick uptake, which is particularly beneficial for flowering and fruiting plants.
Enhancing Soil Health
Aside from nourishing plants, this process gradually improves soil health by increasing microbial activity. Healthy soil translates to resilient plant life, resulting in bountiful harvests and vibrant blooms.
Free and Abundant Supply
The most enticing aspect of DIY liquid fertilizer is perhaps its unparalleled cost-efficiency. Once you’ve set up your collection routine, there’s essentially no cost involved beyond your initial setup.
Conclusion
Arming yourself with the knowledge of how to make liquid fertilizer from organic waste connects you to one of gardening’s most fulfilling and sustainable practices. By turning waste into wonder, you’re not only nourishing your plants but also contributing positively to the environment. It’s a gift to yourself, your plants, and our planet. So why not start today? Dig through your kitchen scraps, bring out your inner alchemist, and watch your garden flourish with life and color. After all, in the world of gardening, nothing goes to waste!


